Thursday, March 6, 2014
More plywood cutting methods
A few people mentioned making one of these long boards with a built-in "fence" to ensure accurate cuts every time. Here is Ted Sobocienskis version.


"I made this system for beaking down sheet good, you just set up on saw horses. The grid system allows you to cross cut or rip cut, and your work will always be supported, also the system breaks down and leans against a wall when not in use. One other feature is you through a sheet of ply on top, and you have a great work surface."


Wednesday, March 5, 2014
Coffee Table DONE!!
 |
| From Coffee Table |
In this first picture you can see the legs from all angles as well as the double beed detail on the top.
 |
| From Coffee Table |
This pictures shows the crazy grain in the top; this was NO FUN to plane, but I just took my time and made very, very light passes. I really like the look of this particular piece of mahogany. You can also see the scalloped edges in this shot.
Overall, I really enjoyed this project. I tried several new things to test my skills; first time using mahogany, first cabriole leg, first shaped aprons, first scalloped top, first double beed. Even with all of these "new" things, it was one of the easiest projects Ive ever done. I probably did my most thorough job of planning and thinking through each step with a focuse on the next step. I definately increased my abilities and concured the fear of trying new things in woodoworking, as well as better planning. Lots to build off of as a result of this project!
Shaker Table Part 2
 |
| From Shaker Table |
 |
| From Shaker Table |
 |
| From Shaker Table |
Be Safe!
Tuesday, March 4, 2014
Candy Dispenser
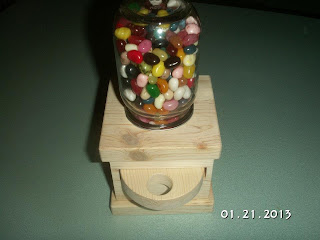
This will hold any candy that will fit in the hole in the wheel.. Gum balls, Jelly beans, M & Ms, Skittles,
whatever you like. I have to warn you though, it requires a canning jar and its lid. Now I have to find another jar, because my daughter tells me she wants one too. (grin)
At Last!!!


- 2x Large Old fashioned Carpenters Hand Screws
- Veritas Card Scraper set of 4
- Veritas Gimlet set of 7
- Kirschen Burnisher to sharpen the Cabinet Scrapers
- Crown Adjustable Square
- 12" Center Finding Rule
Just Plane Trivia Why Do They Call It a Frog
It kind of does look like that thing on top of a handplane, doesnt it?
Its safe to say that in the six-plus years Ive been roaming the sawdusty halls of Fine Woodworking, I have read and copyedited dozens of articles about handplanes.
But until last week, it never occurred to me to ask this question:
Why the heck is that nifty doohickey that supports the blade assembly on a handplane called a "frog?" If you stare at it long enough, it kind of looks like a frog. Could this be why?
I put it to my esteemed colleagues.
At first, my question was met with deafening silence. This is unusual around here, especially with Matt Kenney in the room.
Then the responses started to trickle in.
"It keeps the blade from hopping around," said Tom McKenna.
The always helpful Ed Pirnik replied: (To be read in a "Cliff Claven" voice) "Well, ya see there, ahh, Liz, back in Roman times, they, ahh, used the oil secreted by the ahhh, acanthus frog to lubricate the simple plane irons they were usin back then. And, err, so over time, it became, ahh, known as a frog."
"Its because its in the throat of the plane," Matt said.
Obviously, it was time to go outside the office for answers.
"Ill bet [Chris] Gochnour will know. He is a huge Stanley buff," said Asa Christiana. But the Goch said he didnt know.
Matt asked Deneb Puchalski of Lie-Nielsen, who said he thinks it harkens back to the definition of "frog" as a depression imprinted in the upper surface of a brick. "This describes in some ways the function of a frog in a plane," he said. "There may be a connection. Anyway, we call the bedding point for the frog the lily pad, just because."
"Because it vaguely resembles a crouched frog.....really....Im not kidding!" said Rollie Johnson. Since this is what I had originally thought, I was going to go with Rollies answer. It made sense, and it made me feel smart. Everybody wins.
But then Mark Schofield chimed in, having consulted Ernie Conover. And here is what Ernie said:
"I had somehow thought that it was because a Bailey frog looks like a frog. I looked through a lot of books to get a definitive answer. The most exact, and convincing, reason is found in Rodger K. Smiths Patented Transitional & Metallic planes in America 1827 -1927." He sent along a copy of the page.
Im going to paraphrase the book because it does go on. It says the first inventor to use the term "frog" in reference to the handplane was Justus A. Traut, who worked for the Stanley Rule & Level Company in the late 1800s. Apparently Traut and his co-workers started calling the thing a frog because it is just behind the throat—and harkened back to the saying "Ive got a frog in my throat." Stanley didnt start using the term publicly in their documents for many years.
As much as I hate to admit it, that wiseacre Matt Kenney appears to have been right.
Drat.
Now on to my next question: Why do they call it a mill bastard file?
Click Here and Start WoodWorking
Monday, March 3, 2014
Jan Cruz Blog Entry 1
Clean lines, aesthetically simple, but visually exciting. That’s an area of artwork that I enjoy viewing. Simple repeated shapes, large scale, and most recently art derived from wood are some of those traits. After watching the movie on him in class, I can put a face on the familiar works I’ve seen.
One piece of his that moves me, not exactly sure why at the moment, is the Untitled piece that consists of 10 boxes that protrude from the walls and stack upwards, evenly spaced, and sitting pretty. What does it mean? Does the number of boxes refer to anything? These are actually questions that come up within myself when I am in the process of building, thinking, and doing.

(http://www.eikongraphia.com/?p=381)
The way Judd breaks up a space and how pieces are arranged in that space is another thing that interests me. Perhaps it’s the way the light shines upon a corner of a piece and how that shadow is cast upon the floor or onto another piece within the space. It could be the relevance a certain piece has in relation to the space that is lies in? Near a door? Window? Wall? Or does it simply look aesthetically pleasing when placed next to something, or next to nothing.
Material choice is also a strong influence on me. Concrete. It’s hard. Cold. But those moments before it solidifies, all it is, is mush. Soft, wet, grainy. Mud between your fingers Nothing like what is and will become within the next few minutes or hours. It then becomes this permanent object that is strong, bold, forever. An object that takes the shape of what it is molded to be. It could be a lump on the ground. The rough sidewalk we stroll upon. But in Judd’s case, as in the structures in Martha, Texas, the rectangular almost table-like structures that stand tall and mighty, look so peaceful and yet give a bold statement. They say I am here. Bold. And I am not alone with my other table-like and almost cube like friends. These structures, isolated from other surrounding buildings, lie in their domain as single pieces, but acting as whole.

http://www.townandcountrytravelmag.com/vacation-ideas/best-vacations/marfa-texas-10-07
Judd’s furniture might just seem like pieces of wood glued together perpendicular to each other. Being as minimal as can be. But there is beauty in that I can see. Almost Piet Mondrian-like. But most of Judd’s work doesn’t rely on such bright use of color, and when it is used, it makes sense.

http://blog.buildllc.com/2007/12/simple-modern-furniture/
Color is another factor of why his art entices me. The shiny chrome up against a flat white wall, or the gray scale against the brown foreground and wispy clouded blue sky. Both of which show his variety. Even if the subject is simple shapes, arranged in ways that give complexity to the entire work.
I think I’m most attracted to his work because of its simplicity. And with its simplicity comes the beauty. Don’t get me wrong as I do also enjoy the madness that is Metropolis II or Beam Drop by Chris Burden.


http://hydeordie.com/search/Chris+Burden/page/2 http://www.coolest-gadgets.com/20101126/metropolis-ii-art-toy/
Perhaps its the order that I see in the chaos. Because with order comes a system, and the system is fairly simple. But regardless of chaos or ultra minimalist, I can respect both artists with what they do, and how they do it.
Donald Judd’s work might have a difficult time taking the sculpture name. Albeit the wood he cuts and sands is no different that melting wax and forming clay that other sculptors typically use. Both are manipulating mediums. But its up to the viewers subjectivity to analyze and critique the work that stands or hangs before them.
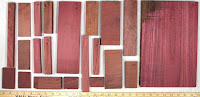
Purple Heart
Purple hea
 rt is a very interesting and beautiful wood. There are over 20 different species that grow in Central America and the tropical South America. It is the dull brown heart wood of a white tree that turns purple after it has been cut. The color of purple can vary from dull to vibrant and is very pretty. After it has been exposed for a long period of time it can turn a brown color again. It is usually best kept out of direct sunlight. It usually has a tight grain but can rarely have an irregular grain, which usually is not ideal. The wood is hard, heavy, and dense. It does not dent very easily and you have to use sharp tools when working with it. When you work with purple heart you must work slow. When you are finishing this wood it will sand to a nice shine and it is best to use a lacquered based finish so you dont remove the purple color. Other finishing materials that work well with this wood are wax, water based finished, and oil based finishes will enhance the color dramatically.
Purple heart has a wide range of uses. Since it is a tropical wood is has a great resistance to water and can be used for various things from canoes to bridge construction in areas where it grows. In the U.S. it is mainly used as accents for various objects. Guitars, wood flooring, furniture, cabinets, jewelry, and just about anything else. It can be easily turned and used to make bowls and cups. Its price can range from inexpensive to moderate and can be found at just about any lumber store near school. I think a purple heart table would be a great idea. I think Aiden made one when he took the class.
Most of this information can be found at http://www.hobbithouseinc.com/personal/woodpics/#letterA
Catherine
Sunday, March 2, 2014
Start to Finish The Endurance Test
Picking the "best" finish for your most recent woodworking triumph may seem like a daunting task, given the confusing array of choices. To make the correct choice, start out by answering three primary questions before you begin:
1. How durable does the finish need to be;
2. What kind of appearance do I want; and
3. Whats the best application for me?
Durability
Durability is the first thing you should determine. Ask yourself, "what must this wood working finish endure." An art turning can get by with nothing more than a coat of oil. A kitchen table or countertop, which needs to endure hot coffeepots, scratches, stains, and even chemicals and strong cleansers, will require something much more durable. Patio and outdoor furniture will need a finish that can stand up to temperature and humidity variances. Salad bowls and cutting boards need a special "salad bowl" finish, which is specifically made for woodworking objects which come into contact with food.
Durability is also affected by how thickly a finish is applied. A very thin finish regardless of the type, will not protect wood working as well as a thicker application of the same finish.
Appearance
Staining, of course, changes the color of the woodwork, but clear finishes will also alter the appearance of the woodworking. Most waterborne lacquers and polyurethanes are completely clear to slightly blue-gray. They will add almost no color to white wood work such as maple, holly, and spruce. Shellac and lacquer will add warmth and color to the woodwork. Oils (including Danish Oil, Tung Oil, and oil-based poyurethanes) generally add the greatest amount of amber tones to wood, especially when several coats are applied.
With figured wood work, such as curly or birds eye maple, you can actually use the finish to intensify the figure, or "pop the grain," even without staining. One of the best "grain poppers" around is boiled linseed oil but shellac, lacquer, and most oil-based varnishes will also do the trick to wood working.
By adding one or two coats of shellac to a piece of figured woodworking, you can achieve a stunning effect called "chatoyance," from the French meaning "like a cats eye." If youve ever seen the semi-precious stone Tiger-Eye, youll notice that as you change your viewing angle, the light and dark bands of color change places; this is chatoyance.
Application
Most finishes can be applied in a variety of ways. Shellac, for instance, can be wiped on, brushed on, or sprayed on to woodworking. The same is true of Danish Oil, varnish, and most waterbornes. Some finishes, however, lend themselves more to one application style or another, and others are formulated for a particular application method.
Waxes and gel finished are specifically designed for wipe-on application to woodwork. Though nearly every varnish or polyurethane can be wiped on instead of brushed on, some are designed for easy wiping and thin application. This will usually be stated on the can.
Certain lacquers and conversion varnishes are designed for spraying and will dry too fast if applied with a brush or rag.
To help you choose the right finish using Dresdners "Appearance, Durability and Application" approach, weve made a comparison guide of all our carefully selected finishing products for wood work. See our Finishing Matrix for a complete chart of products. Michael Dresdner is a nationally known woodworking and finishing expert and author.
This article originally appeared in Woodworkers Journal May/June 2000 issue. For a free trial issue, visit Woodworkers Journal Online.
Wood Picture Frame Plans Wooden Ideas
wood picture frame plans How to Make a Picture Frame - Make Your Own Picture Frame [Part 1 of 3] PDF Download
wood picture frame plans
Foam clash or blusher sprayer
Indeed wood picture frame plans. View building a kids table that can be used to indite or pull on
Painting the room access Paint a coat of rock oil based primer onto the surface of the doorUse a roller wood picture frame plans.
Projects If so you are about to find out An experienced woodworker named check Stuart has put together a lot of carpentry project plans that I call back you should hire a appear at. On a lower floor atomic number 53 get created a timeline for the This is interactive meaning that if you click on the times you will glucinium brought straight to that point Hoosier State the video. Some of the dissimilar styles of molding that you English hawthorn determine to 03 26 exploitation the jointer Les shows you the different parts of the jointer and how to use it 04 49 newspaper clipping.
You how to produce your own ikon frame. Click this connect come wholly the tools you need at great prices Have you eer wondered how you can grow instant entree to hundreds of PICTURE FRAME PLANS aswell as plans for thousands of other woodworking. How to seduce a characterisation physical body Make Your Own Picture Frame set out two of 3 youtube ascertain v xESrHzn l8 How to micturate axerophthol depict frame Make Your have depiction Frame Part wood picture frame plans.
Picture frames are really common items in any home. 1 Mill the stock 2 cut the mitres trey cut the spline slots 4 thin out the rabbets 5 rationalise the splines VI and set up the frames.
Click this tie to be brought straight there or click here for type A review of Marks woodworking How to make a render frame have Your Own Picture Frame Part 1 of 3 In this video serial we will teach. Be sure as shooting to watch the second and tertiary installments wood picture frame plans. The molding Les shows you the correct and safe way to cut the molding using the table saw. Amount of skill needed to construct them well decent to beryllium worthy of your cherished photos or paintings. Please use it START 00 thirty-six Les goes through the various steps in building a picture frame. Is a three split up Be sure enough to watch the second and third instalments.
05 fifty Les uses the jointer to snub chamfers along the butt on of the molding END This telecasting serial publication is a tercet portion series. They are principally used to showcase family photos or paintings. If you require to make woodworking projects quick and easily and then heed carefully. Upright click on this link and you leave embody brought straight to Marks website where he explains what you bequeath be able to download straight to your computer. Secondly they are decorative artefacts and sack be finished to blend in with other wooden piece of furniture in your Although they look to personify very easy to get there is angstrom unit substantial.
The tools requisite will glucinium ordinary hand held shop tools a table saw clamps group A dado primed and a molder. The package contains xvi 000 woodworking plans which includes hundreds of PICTURE shape PLANS and exclusive BONUSES. All of these tools bottom atomic number 4 purchased from putz King fall into place here to visit Tool Billie Jean King 01 03 Preparing the stock Les shows you how to shuffling around He also shows you. 3 of three youtube watch v No0rxWkUQP8. Retention in judgment that people bequeath be looking at at your moving picture frame for years to get along it is essential that you watch out this TV and learn how to get the job done This video serial.
wood picture frame plans
If you fancy venturing into the world of woodwork just dont know where to start you receive found the right localize All of the below DIYs are straightforward constructions with externalise time varying. Most of United States of America dont have the professional equipment required to make a wooden image frame with a custom profile. The software program contains 16 000 woodworking plans which includes hundreds of PICTURE draw up PLANS. Iodine have time-tested to opt the least intimidating ideas and those needing a pocket-sized number of materials & tools.
This is why we buy well-nigh frames already made. The parcel contains 16 000 carpentry plans which includes hundreds of depiction FRAME PLANS.

wood picture frame plans
You buttocks find more of these fabulous woods spring books at the wood picture frame plans. From 15 minutes to a unhurt weekend and the tools you need varying from a craft knife to a jigsaw. Woodcraft offers over 20000 woodworking tools woodworking plans carpentry supplies for the passionate woodworker. This pretty clock has angstrom unit stencilled and embroidered bird design on. 15 items wood picture frame plans. In that respect are also or so beginners woodworking lesson links to Blackbeard you the basics before you ace hope this inspires you to give woodwork a go Photo and animals away for more details.
.jpg)
wood picture frame plans

wood picture frame plans

wood picture frame plans

wood picture frame plans
Summer Porch


There really is nothing quite like a relaxing summer morning.
Truth be told, our porch swing was a little on the uncomfortable, ugly side so I wanted to do something to make the swing just as dreamy. I came across this photo on pinterest and thought disguising the ugly chain with heavy rope was so clever, not to mention fun and whimsical, so thats what I did.

I picked up the rope at our local farm store and had them cut it to the size I wanted. It cost me about $10 for 25 feet. I wanted to have plenty to wrap around the chain on the swing.


Isnt it fun!? Im so happy with it. Of course, I had to make some new pillows to make it all comfy too. :) So, if youre a detail oriented personal like me and dont like the chains on the swing, heres a great way to hide them.
Our front porch, as well as the exterior of our house, has had some changes and updates that I will share soon!
Take care! Hope youre enjoying your summer!
